Sunday 26th May 1940
Ready for Battle
By 26th May, 367 Battery’s guns were ready, positioned at Chateau Masson (Regimental HQ), on the Mont St Recollets and at various sites around the perimeter of Cassel to face the expected German advance from the South-West.
War Diary 145 Brigade, 26th May 1940
09.00hrs. Positions improved. Some bombing and air reconnaissance. Enemy patrols probing forward positions. Reports of enemy AFV movements in woods to the Southwest. Brigade Command visits all 4th Ox & Bucks LI positions with CO.
Two Gloster carrier patrols with anti-tank gun and 18-pounder sent to Southwest towards Fôret de Clairmarais. Run into an ambush of two enemy tanks near Cassel and lose anti-tank gun and 18-pounder before returning. They are told to go out again and find them by Brigade Commander. Later, they return reportedly having knocked out the two tanks and patrolled to the edge of the Fôret de Clairmarais, finding no other sign of the enemy.
14.00hrs. GHQ LO arrives. Brigade Command asks again for a Battery of 25-pounders which would have the range to shell the Fôret de Clairmarais, and some anti-aircraft guns to deal with the dive-bombers.
14.30hrs. GOC 48 Division (General Thorne) arrives and tells Brigade Command that 145 Brigade has reverted to his division. 144 Brigade is to take over Wormhoudt and 1st. Light Armoured Recce Brigade (Brigadier Norman) is to come under command 145 Brigade. General Thorne also suggests positioning some forces Southwest of Cassel along the railway line, and also in the blockhouse to the North. He reports that the Germans are likely to withdraw back across the River Aa “out of the pocket they have got themselves into.” He does not mention the withdrawal to Dunkirk.
15.30hrs. Brigade Commander sets off with the CRA to tour his area. He issues a Warning Order to 2nd. Glosters to recce the blockhouse and to stand by to send off a Platoon to occupy it later.
16.00hrs. Brigade Command visits Hondeghem between Cassel and Hazebrouck held by F Troop of 18pdrs. from K Battery 5th RHA and a Searchlight Company from 2nd. Searchlight Regt RA, under Maj Hoare RA. He subsequently orders a section of Carriers from the Bucks Battalion to move from Hazebrouck to Hondeghem to add a mobile element to the defence.
Brigade Commander then moves on to Hazebrouck and visits the Bucks Battalion. He recognises that they have an immense task. He orders them to try to make contact with 44 Division on their left and to send a carrier patrol in that direction towards Morbecque.
Brigade Commander then visits 144 Brigade to the North of Cassel. The Troop from 140th. Regt RA is ordered to return from Wormhoudt to Cassel [this move doesn’t feature in any 140 Rgt accounts].
On his return to Cassel, Brigade Commander orders 2nd Glosters to send a Company to Zuytpeene and to occupy the blockhouse, and the 4th Battalion Ox & Bucks LI to send a Company with an anti-tank gun to Bavinchove. These two companies are to act as breakwaters on the expected enemy approach routes.
Evening – D Company 4th Ox & Bucks LI moves to Bavinchove as a breakwater. According to some personal accounts, D Company 4th Ox & Bucks LI set off from the Mont des Recollets but came under some enemy fire to the South of Cassel. They may have been withdrawn briefly before being ordered to press on to Bavinchove. They arrived at last light. Once at Bavinchove, it appears they occupied a position with two Platoons to the North of the railway line, and therefore for the most part outside the village, with No. 8 gun from the Brigade anti-tank Platoon firing along the line of the railway. One Platoon was in the village forward of the railway. A locomotive seems to have been used to block one of the two railway crossings. Otherwise, positions do not seem to have been very well prepared.
A Company 2nd Glosters is sent to Zuytpeene, and 8 Platoon under 2 Lt. Cresswell to the Le Pequel blockhouse to the North.
4th Battalion Ox & Bucks LI position on Mont des Recollets taken over by East Riding Yeomanry and 1st. Welsh Guards who have arrived during the day.
After dark, Lt. Col Knot RE arrives and reports that the Construction Companies are to be withdrawn to Dunkirk. 145 Brigade is left with two Field Sections of 226 Field Company RE under Maj Griffiths. The third section is in Hazebrouck.
Report from French civilians that the enemy is withdrawing Southwest from St. Omer, which ties up with report from the carrier patrol. Brigade Commander does not believe this and prepares a plan with the CRA to deal with armoured attack the following day.
Night – some shellfire. Cycle patrols sent out.
War Diary, 145 Brigade 26th May 1940
Monday 27th May 1940
A Grim Fight for Survival

Somerset’s 145 Brigade positions at Cassel from 27th May. Glos Rgt to the West [B, D] of the town, OBLI to the East [A, C]. 140 Rgt RA positioned in Mont des Recollets [D] to the East
Lord Gort’s Perspective: Operation Dynamo begins at Dunkirk
On 26-27th May 1940, Lord Gort moved B.E.F. GHQ from Premesques, near Lille, to Cassel, escorted by the ‘Hopkinson mission’ (a unit of the B.E.F. commanded by Lt Col Hopkinson). It appears this move was very temporary, as soon after he relocated his GHQ to Houtkerque, about nine miles to the north of Cassel. It was late on the 27th May that Lord Gort received orders, by telegram from London sent to Houtkerque, to begin the evacuation of the B.E.F.
On the 27th May, British cross-channel ferries began the evacuation of the first B.E.F. troops from Dunkirk harbour. The Luftwaffe started intense bombing raids of Dunkirk, however under fire 7,669 B.E.F troops were successfully evacuated.
German Perspective, 27th May 1940
The German intention was to close their Western ‘pincer’ spearheaded by elite Panzer troops and SS divisions across the main Dunkirk road at Cassel to join the less mechanised regular German forces who were threatening the Belgian approaches to Dunkirk at the town of Poperinghe. This would have the effect of sealing off all the roads into Dunkirk through Belgium and France, thereby trapping the majority of the BEF before it could reach the beaches at Dunkirk.

German positions on 27th May 1940. From ‘Dunkirk -German Operations in France 1940‘ by Hans-Adolf Jacobsen
Belgian surrender – 27th May
There had been numerous developments across the entire Flanders battlefield. Also on 27th May, the B.E.F’s situation deteriorated dramatically after the Belgian King Leopold III had announced his intention to surrender to German forces and as a result of the Belgian collapse, the British escape corridor to the North-east had suddenly became extremely vulnerable.
Massacre at Vinkt
King Leopold’s announcement did not prevent a massacre of between 86-140 Belgian civilians that took place at the town Vinkt, near Ghent at the hands of regular German Army troops.
Massacre at Le Paradis Farm
Also on this day, about 20 miles to the South of Cassel, at Le Paradis farm near Bethune, 97 men of the 2nd Norfolk Regiment suffered a massacre at the hands of SS troops.
Meeting at the Hotel du Sauvage, 27th May
In Cassel itself, early in the day and somewhat unwisely given the proximity to the front line, the British and French High Command held a high level meeting at the Hotel du Sauvage. Lieutenant General Sir Ronald Adam represented the BEF and Général Bertrand Fagalade the French. In attendance were Generals Blanchard, Prioux (commanding French 1st Army) and Koelitz (representing Gen. Weygand). It was probably the last time these commanders all saw each other.
 Hotel du Sauvage – Where Lord Gort’s plans for Operation Dynamo were revealed to the French High Command on 27th May 1940

The meeting room with extensive views of the Flanders plain to the south
At the meeting the British first informed the French, in coded terms, of their intention to evacuate the entire B.E.F. However, the meeting had to be terminated after less than an hour due to shellfire and the commanders had a lucky escape.
Panzers attack Cassel
After heavy bombing from the air and continuous mortar fire throughout the morning, a major assault then began on the town from the South and South-east. German tanks of the Sixth Panzer Division broke into the defences in a number of areas on the more gently sloping ground approaching Cassel but were eventually driven off. There were heavy casualties, with D Company of the Oxford and Bucks reduced to less than 50 men.

Cassel- looking South from the summit in the direction of the main Panzer division assaults

Cassel- South-Western approach, which has a gentler slope onto the Flanders plain. It was attacked by Panzer divisions and defended by the Gloucester Regiment.

German Infantry approaching Cassel from a North-Easterly direction

Panzer & Motorcycle combination approach Cassel from a Southerly direction (with colourised image)
The ‘Picket’ villages: Zuytpeene, Bavinchove and Hondeghem
The main twin-track railway line ran along an embankement at the south-eastern perimeter of the hill leading into Cassel and was judged to be a good forward position at which to stop, or at least to delay, the Germans. Brigadier Somerset ordered ‘A’ Company, Gloucester Regt to defend the hamlet of Zuytpeene, accompanied by an anti-tank gun, while ‘D’ Company of the 4th Ox & Bucks went to the rail station at Bavinchove, about 1 mile further east along the railway line.
The idea was to create a wider defensive perimeter, hopefully also dividing the strength of the German attack by reducing their ability to concentrate force. During the fighting on 27th May, the outlying village of Zuytpeene was surrounded and eventually surrendered and similarly the railway station at Bavinchove was captured after an heroic defence had taken place in both villages.
The ‘Glorious Gloucesters‘ stand at Zuytpeene
On the morning of the 27th May, Major Percy-Hardman, officer commanding ‘A’ Company met with a small force of French troops and set up defensive positions at Zuytpeene. Almost immediately nine Stuka dive bombers attacked Zuytpeene and dropped twenty-seven bombs on the town’s western end. The French force fled in panic. Less than an hour later, around 10.00hr, Zuytpeene came under assault by by twenty tanks and in excess of a hundred infantry. Mortars and machine gun fire poured down upon their position.
By 12.00, A Coy were ordered back to Cassel but sadly this message did not reach them. The heavy German attack on Zuytpeene continued and they began to penetrate along the railway embankment. Sgt Gallagher moved his 7 Platoon to the top of the exposed embankment. This was a very risky manoeuvre but his bold plan came off as the enemy retreated once again. Relentless shelling, mortaring and machine gun fire raked the remaining few men of ‘A’ Company for the rest of the day.
By 17.00, Sgt Gallagher and the few remaining men of 7 Platoon were the only ones left at their post. The few other able-bodied men of ‘A’ Company were located in one of the nearby houses that had formed the Company Headquarters, tending the many wounded. At 19.00, two privates from the company arrived in Cassel, after having had somehow fought and dodged their way back to the town. They reported themselves the only survivors. They were, however, wrong. Their comrades continued to fight into the evening of 27th May. ‘A’ Company had barricaded themselves in the house where the casualties were being treated and stood, fighting room to room. Eventually, the few remaining survivors found themselves in the basement with hand grenades rolling through the windows and a company of enemy infantry swarming through the rest of the house. Major Percy-Hardman surrendered what was left of his battered command around 19.00.

Sketch map showing some of the locations of the conflict at Cassel- the main railway line is marked in green.
The Battle at Bavinchove (Cassel Station) 27th May 1940
Just an hour and a half into the German onslaught of Zuytpeene, word was received that the Ox & Bucks to ‘A’ Company’s left had been pushed out of Bavinchove, following a short but fierce fight. The advancing column of 6th Panzer Division had been racing along the road from the town of St Omer to Bavinchove and had been briefly held by fire brought upon them from the Ox & Bucks’ defensive positions. The German armour then began to encircle the village, encouraging Capt Charles Clustom– officer commanding ‘D’ Company 4th Oxf & Bucks LI – to withdraw before he and his men became trapped. The anti-tank gun that D Coy had positioned on the railway line itself reportedly accounted for four German armoured vehicles before the defenders escaped.
The first company of the 11th Panzer regiment was assigned to the von Esebeck tactical group. German Panzer officer Jurgens described the attack as follows:
“…Ltn. Bode, of the motorized company and the 1./11 are at the head of the march. We are progressing slowly, feeling the ground. In front of Bavinchove we are attacked from the heights of Cassel. In the locality, a railway line crosses the road, which is our axis of progression towards Cassel. Two locomotives had been placed there to block our path. I have two Panzer IVs placed at the exit of the locality to ensure our safety. Grenadiers voltigeurs are posted near the houses. The tanks of the 1./11 are in front of the locality ready to intervene.
Colonel von Esebeck asks me to attack, I’m about to do it as soon as the locomotives are moved. Suddenly, everything cracks around us, everyone takes shelter. Panzer IV’s open fire. Two English caterpillars are destroyed.
The commander of the motorised company, Lt Col von Seckendorff arrives at my position. In front of us, we have Englishmen who defend themselves fiercely. English caterpillars descend on the road to Cassel. The first is destroyed by a Panzer IV, the others turn around. During the night, Lt Col von Seckendorff ensures security with infantry. The tanks are resting.
We are preparing the attack on Cassel for May 28th’….


The railway station that serves Cassel in the village of Bavinchove. The images show the railway crossing present day & 1940. British Engineers had positioned railway locomotives on the crossing to obstruct the D933 road.
Zuytpeene aftermath
In the churchyard at Zuytpeene, there are three Commonwealth War graves with an unusually large date range of death. The three bodies of Privates King, Sims and Tilling were said to have been found dead in the church tower, which was being used as observation platform. The Germans realised this practice and church towers were usually the first thing to be shot at by approaching German artillery.

The ‘picket’ village of Zuytpeene. The church and Commonwealth War Graves in 2019.

Germans arrive at the Zuytpeene Church 27th May 1940

Sketch map of the Attack on Zuytpeene, with thanks to David Hineson
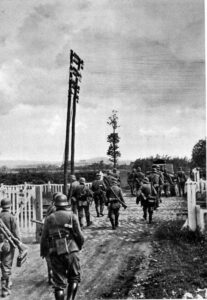
German infantry crossing railway line outside Cassel
The Battle at Hondeghem and Saint-Sylvestre-Cappel- the heroic stand by Royal Horse Artillery
The village of Hondeghem is about 4 miles to the South of Cassel and its heroic defence on 27th May 1940 has become one of the legends of World War Two. ‘K’ Battery, Royal Horse Artillery, equipped with the same 18-pounder guns as 140th Regiment, was ordered to defend the village with approximately 75 personnel of a searchlight battery under the command of Major Ramsden-Hoare.
At 07.00 hrs on 27th May 1940, German tanks and infantry attacked the village in considerable strength, including air support. The RHA was vastly outgunned and outnumbered. The first onslaught caused two guns and detachments to be knocked out together with at least 5 Bren gun crews. The remaining personnel defended half the village until 1600 hrs when ammunition began to run out and the village was almost entirely surrounded.

Iconic painting of the RHA in action at Hondeghem
The 18-pounder guns had to be man-handled throughout the day under a hail of machine-gun fire with the purpose of firing directly point-blank onto enemy positions. Throughout the entire day all shooting was at very short range over ‘open sights‘.
Three enemy armoured vehicles and at least 2 machine-guns were completely destroyed. One machine-gun was just about to sweep the village square from the cookhouse doorway, when an 18-pounder scored a direct hit at approximately 60 yards range. On another occasion an 18-pounder blew up the ammunition dump of a trench gun and silenced it for over three hours.


Hondeghem Church – the focus of intense fighting on 27th May 1940, taken from Rue de la K Hondeghem Battery, 2020
Saint-Sylvestre-Cappel
The Germans continued to shell Hondeghem village until the RHA was ordered to return to Cassel. The two surviving guns, towed by Quads and with other troop vehicles, made their way with the wounded along the country lane to the adjacent village of Saint-Sylvestre-Cappel.
On arrival at the village the main road running through the village was found to be in held by the enemy equipped with medium tanks. Orders were hastily given and the British troops took up positions by the church, where they were joined by a group of some twenty men from the Royal Army Service Corps armed with rifles and Bren guns.
Bayonet Charge
The troop commander decided that the best way to dislodge the Germans to their front was by an improvised bayonet charge. Two parties were formed, one advancing around each side of the churchyard. In the face of this onslaught, the Germans dropped their weapons and ran away. The fight at Saint-Sylvestre-Cappel lasted around two and half hours; the men had shown immense bravery and coolness under fire, having been in combat almost continuously since 07.00 hrs.

Commonwealth War Cemetery, Saint-Sylvestre-Cappel, 2019


Taken from the K Battery RHA War Diary documenting individual bravery during the action at Hondeghem

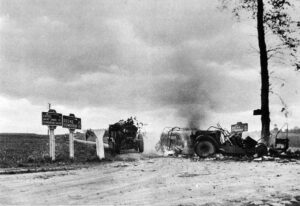
An incredible battle image from Soldiers of Oxfordshire Museum archive. Burning RHA vehicles on road from Saint-Sylvestre-Cappel towards Cassel
Chateau Masson, 140 Regiment HQ under attack
In the attack of 27th May, the Chateau Masson HQ, which was on lower ground in the col between Mont des Recollets and Cassel, suddenly became part of the front line (‘FDL’) and a gun was placed on the road to act as an anti-tank defence.

140 Regiment 18-pounder covering D916/D933 junction into Cassel
The 140th Regiment was in action here and helped to knock out five tanks, while HQ personnel also helped to fight off German infantry in the first of the assaults on Cassel. During the engagement German infantry succeeded in reaching the Chateau and seized the Regiment’s radio equipment before being fought back.

Chateau Masson, named after the owner of Mt des Recollets (which was previously used as a commercial sand quarry)

View from the frontage of Chateau Masson looking towards the D916 Road, this area became part of the front line and was eventually over-run by advancing German troops. 367 Battery claimed five panzer tanks destroyed during this engagement.
2nd Lt Rowland’s Diary

Sunday 26th May 1940. ‘Fought action all day. Knocked out five tanks. Inf & Cav disappeared. GHQ Capt called … & food. Heavy casualties. MO [Medical Officer- Capt Lacey RAMC] worked like Trojan. Moved into CASSEL in evening, took wounded on foot under fire most of way. CASSEL burning on arrival. Went to HQ with Col & recced RHQ. Everyone else asleep. Col broke leg looking for Tp. MO sent him off in Z [Staff car] to CCS [Casualty clearing station]. Bird turned up & joined [?Plumpton]’.

Monday 27th May. Heavy shelling from Arty [Artillery] & mortars. Considerable damage done. Many buildings in flames. Enemy apparently attempting to encircle town. Many dead & wounded’.
‘F’ Troop’s Last Stand
At around midday ‘F’ troop, 140th Regiment, led by Captain Ronald Baxter with Lieutenant Jack May, Lieutenant Charles Bennett, Sergeant Harold Swindle and Bombardier Arthur Ross, were engaged in a short-range duel with German Panzer tanks that were attempting to advance Northwards along the line of the D916 road in the gap between Cassel and Mont des Recollets.
The engagement resulted in Sergeant Goodrum and Swindle’s deaths, and both Lieutenant May and Lieutenant Bennett were seriously injured. Gunner Ernie Pilbeam later recounted that it was a premature explosion of a shell that had killed Goodrum and Swindle. It had a faulty fuse and detonated immediately it left the gun muzzle.
Lt. Jack May was to escape at Dunkirk but died on 21st June 1940 of these, and subsequent, injuries. Lt. Charles Bennett was captured on 30th May and spent the remainder of the war as a POW. Sergeant Harry Swindle has an unknown grave and is commemorated at the Dunkirk Memorial. Bombardier Arthur Ross was injured by rifle fire during the breakout on 30th May and died in captivity on 3rd June 1940.

Part of F troop, 367 Battery
The 140th Regiment’s War Diary comments that the Northern Troop, on the other side of the Mont des Recollets and commanded by Lt Col Odling, was unable to assist in the defence of the HQ and ‘F’ troop’s gun battery position. Their guns were unable to elevate their fire sufficiently over the rising ground between the two positions.
Ronald Baxter’s Diary
Ronald Baxter’s account of the events reads:
26th May. Dead ponies in Chateau grounds. Visited Infantry mess in Chateau. Made up arrears of sleep. German parachute flares much in evidence. Little air activity. Battery sergeant Major O’Connell and his party lost in Lille. Bombardier Webb went back as far as Lille and found them. A good job of work. Into Cassel to find Mason Macfarlane H.Q. Did so. One map in Battery. Baths in the cottage. First time we had lived under a roof since 11th May.
27th May: Up at 5 am. Drove our truck with A/c, and signals Webb, Temple, Wilson, Sergeant Thrussell. Manned O.P. Took over only map in Battery! Not liking position of O.P., moved behind solid brick wall. 11 am. Very soon column of vehicles appeared on the St Omer road. Could not identify them at the distance. Our own movement and F.D.L.s were not known for certain. Reported to Regimental H.Q. Engage or not? Answer. Do not engage. Brigadier uncertain of identity. Column remained stationary all morning. Meanwhile guns of 5 R.H.A. in action.
Resolved to find out more about the situation. Went into the town. Found O.P. officer R.H.A. who was firing on the same column that I had reported. Good enough.
Returned and prepared to engage. Difficulties. No Zero line. Groping in dark. Had not been allowed to register target area owing to lack of information re. F.D.L.s. However, got ‘F’ Troop into action. Meanwhile German guns seen in position further to left. Switched over to engage them. No hits but made them move.
Back to road target target. Firing of our guns erratic. May have hit a vehicle or two. Linked D. Troop on. German shell or mortar falling about OP. Searching for RHA guns. Wire cut. Wireless control only. Very slow. Enemy column moved up into Bavinchove.
Wall receiving plenty of splinters. Officer from Ox & Bucks came along to post one of his men on German side of wall behind a tree. Do not know why. Shortly after killed by shell fragment Sergeant Thrussell helped to get him in. Paddy Sirkett arrived on scene Tried his hand at the game of hitting the now hidden Germans in Bavinchove. Sounds of a general flare up all round. Signaller Wilson unable to repair wire
Back at Troop position things were going badly. Round about midday German tanks had appeared a mere 300 yards from the guns. Jack engaged over open sights. A duel ensued. Several of the guns crews were wounded, including Sergeant Harcombe and Gunner Preston, Sergeant Goodown was killed. Sergeant Swindle returned from the Aid post, having been wounded in the foot and resumed his duties. Unfortunately, soon after he was hit and died almost immediately.
Jack May then received severe wounds in the arm and shoulder. Directed operations from ground. Shewed a fine example under very trying circumstances. Meanwhile two German tanks had been knocked out. Exchanges unequal. Charles Bennett took over, receiving a splinter in back. He was finally ordered to evacuate the position. High praise is due to all ranks for the steady discipline shewn during this period. The wounded, including Jack May were treated by our M.O. Lieutenant Lacey at the Regiment Aid post. The stretcher cases were removed. I did not see Jack again.
At the same time the work at O.P. [Observation Post] had become impossible, German tanks had worked their way up the road from Bavinchove to within a few hundred yards of town. Paddy went off to get his truck away while the going was good. As the German tanks were within sight and short range and no one in O.P. area about, took it upon myself to get in touch with Ox & Bucks. Unfortunately mortar ammunition only smoke. Ox & Bucks organized an attacking party which cleared Germans from Chateau grounds. My anxiety for Paddy.
Withdrew into town, established H.Q. in corner Estaminet. With Sergeant Thrussell recce’d environs. German tanks had meanwhile retired for reason discovered next day. Late in evening met Colonel Odling and R.H.Q. party coming in. Heard of Jack being a casualty. Left Sergeant Thrussell in charge of Estaminet. Went back to Troop position.
Machine gun fire covering crossroads Uncomfortable trip. Arrived Troop position found Charles Bennett with orders to pull out. Now dark Welsh Guards as covering party. They stayed 20 minutes. Uncertain of German positions.
Withdrew guns, leaving Jack’s truck and cottage behind. Set off to investigate house. Back in Cassel. Vehicles parked in street and Inn yard. Wounded in basement. Rendezvous with Major Christopherson. Go to find Colonel Odling. Find him lying by roadside with broken leg. Out of action. Send for his truck. Visit to Brigadier Somerset. He left Christopherson to choose positions. Christopherson and I return to R.H.Q. Glass of Whisky. Fell asleep. Alone off to site guns in anti tank positions. Spent all night doing this. Rest of Battery outside of town.’
Brigadier Somerset’s Perspective
Brigadier Somerset describes the multiple German attacks of 27th May in his War Diary. He refers to the Panzer attack on 140th Regiment’s HQ and states: ‘Heavy tanks came up under what cover they could get and opened fires with all weapons. They appeared to be trying to get a footing ion the col between Cassel and Mt. de Recollets. The fire was very accurate and continuous and their tanks were very daring- as a result many were knocked out. They imagined that we should bolt if they were persistent enough as had happened elsewhere.’

Somerset’s War Diary describing the events of 27th May 1940
145 Brigade War Diary 27th May 1940
‘…Early morning – an hour of heavy enemy shelling. Enemy AFVs seen moving on a wide front towards Cassel from the Southwest. This is the advance elements of Kampfgruppe Von Esebeck of 6 Panzer Division. 07.00hrs. shots fired on D Company 4 Ox & Bucks LI front.
07.30hrs. Meeting in Hotel Sauvage, Grande Place Cassel, between General Adam (Commanding the Dunkirk Perimeter), General Lindsell (QMG BEF), Lt Col The Lord Bridgeman, (Ops Officer Dunkirk), French Generals Fagalde, Blanchard, and Koeltz, and Admiral Abrial, Port Commandant, Dunkerque, to approve the plan for the defence of the final perimeter drawn up by Col Bridgeman.
Also, the Advance Party from BEF GHQ under General Pownall arrives with a Signals detachment, which starts laying telephone lines for the occupation of the town by GHQ Main. As the battle starts, they hastily depart. [BEF GHQ moves to Houtkerque, before their final position at De Panne]
08.00hrs. An attack develops on D Company 4th Ox & Bucks LI in the village of Bavinchove by 4 AFVs, and motorcycle Troops. No 8 Gun from Brigade anti-tank Platoon quickly knocks out 4 AFVs. Lorried infantry then dismount and begin attack on D Company. This is Kampfgruppe von Esebeck who speedily outflanks the defence as well as attack through the village. Lorried infantry seen dismounting to the West of Cassel and attack also develops on A Company 2nd Glosters in Zuytpeene. This is also Kampfgruppe von Esebeck.
Maj Hoare at Hondeghem reports by radio he is under attack by AFVs and enemy have penetrated the village. This is the Kampfgruppe von Ravenstein of 6th Panzer Division moving East between Cassel and Hazebrouck towards Wallon Cappel. The Brigade Commander sends relief column of East Riding Yeomanry and anti-tank guns to Hondeghem under Lt Freeker RA of 53rd. Worcester Anti-tank Regt but it is ambushed on the way near St Sylvestre and remains pinned down for most of the day.
Freeker has to be rescued by carriers and a Platoon of 1st. Welsh Guards. Brigade Command orders Gunners to shell forward edge of Hondeghem. 5 RHA carry out an accurate shoot directed by radio from the OP in the church tower in Hondeghem. While the tanks of 65 Tank Battalion of Kampfgruppe von Ravenstein bypass the village and continue East, the infantry of the Rifle Regiment spend most of the day trying to take the village.
09.00hrs. A motor convoy of 9th Sherwood Foresters of 46 Division who were moving to Steenvorde is ambushed by Stukas in Grand Place, Cassel with many casualties.
10.00hrs. Contact with Hondeghem lost and enemy tanks reported in St. Sylvestre cutting off road to Hazebrouck. Some Enemy AFVs run into 4 Royal Sussex of 133 Brigade/44 Division positions at Caestre to the Southeast of Cassel and 6 are knocked out, discouraging further forward movement.
10.30hrs. D Company 4th Ox & Bucks LI is outflanked and begins to withdraw under mortar fire to intermediate position ½ mile South of the town. Capt. Clutsom brings wounded out in his car under fire, making three trips. 30 tanks then pass across D Company front, heading East. This is probably Kampfgruppe Koll heading towards the East end of the town. D Company is eventually supported by some of C Company 2nd. Glosters coming down the side of the hill to cover withdrawal into the town. They eventually return to a position on the East end of Cassel opposite the Mont des Recollets. Brigade Commander orders RA to shoot on further enemy columns at Les Trois Rois approaching from the southwest. Some problems of crest clearance interfere with this shoot.
11.00hrs. A Company 2nd. Glosters holding out in Zuytpeene come under heavy mortar fire. Brigade Command orders them to withdraw but runners and a carrier fail to get through. They are surrounded.
13.00hrs. After intense artillery and mortar preparation, the Kampfgruppe von Esebeck attacks with approx. 40 tanks and infantry on the South and West end of the town held by C and D Companies 2nd Glosters. Enemy AFVs get into D Company perimeter. OC B Company comes with a party to the rescue to stalk the tank with a Boys anti-tank Rifle. They are hit by their own mortars. The tank is eventually knocked out by an anti-tank gun. Anti-tank guns knock out several tanks on the slopes of the hill, which cannot surmount the ramparts. C Company 2nd Glosters finally beats off AFVs supported by Infantry.
Another attack develops towards the col between the town and the Mont des Recollets held by A Company 4th. Ox & Bucks LI. This is Kampfgruppe Koll of 6th Panzer Division. Brigade HQ is hit by shellfire and moves to a more sheltered position 150 yds behind the hill. Padre Wild of the 4th Ox & Bucks LI sets up an improvised First Aid Post in Brigade HQ.
Enemy infantry using the cover provided by woods gets so close to Brigade HQ that Brigade Command orders Sappers from the Field Company to form improvised defence platoon. CSM Bailey DCM of A Company 4th. Ox & Bucks LI leads counterattack down the slopes to the South and evicts enemy infantry from the chateau [Masson] at the foot of the hill.
Some of B Company Ox & Bucks LI from Brigade Reserve under Lt Keene are sent to reinforce this counter-attack. Battalion mortars are firing into dead ground below the town. Carriers are brought forward and clear enemy from road downhill towards Mont des Recollets.
Attacks are seen off by 16.00 hrs. with 25- 30 tanks lost to anti-tank fire and 18-pounders of 140 Rgt RA firing over open sights. Capt Dixie (Bucks Battalion) OC Brigade anti-tank Company is killed.
16.00hrs. Maj Hoare finally withdraws the survivors of his Troop of K Battery and the Searchlight Battery from Hondeghem with his two remaining 18-pounders. They are ambushed en-route at St. Sylvestre and lose their guns.
18.00hrs. Enemy attacks blockhouse to north of Cassel held by 2 Lt Creswell but fail to make any impression. Brigade Commander orders carriers of 2nd. Glosters to reinforce but they come under heavy machine-gun fire and withdraw to Cassel.
19.00hrs. Remains of A Company 2nd. Glosters finally overrun in Zuytpeene.
22.00hrs. Enemy finally withdraws but some infiltrate onto Mont des Recollets and bring the road up into the town under machine-gun fire. Enemy drops leaflets calling on garrison to surrender as they are surrounded.
After dark, Brigade HQ moves again into town to the Gendarmerie where 4th. Battalion Ox & Bucks LI have their HQ. Night – Patrols by both sides, including an unsuccessful attempt to get through to Zuytpeene.
During the day, radio messages had been received from the Bucks Battalion in Hazebrouck to say they were under heavy attack and that the enemy was getting into the town. Brigade Command had asked 44 Division to the South of Hazebrouck to help. No help is forthcoming…’
Full text of 145 Brigade War Diary, 27th May 1940 describe the huge events of that day.
140th Regiment relocates into Cassel Town
Later in the day, Chateau Masson was eventually over-run and the HQ staff and southernmost gun troops had to relocate to join Brigadier Somerset’s position into the higher ground of the town centre.
At the same time, the other Regiments holding positions on the Mont Des Recollets, and survivors from the battles at the ‘picket’ villages (with the exception of Lt. Cresswell at the Le Pequel bunker in Hardifort) were also forced to consolidate their positions into the town of Cassel itself.
Eecke
Enemy attacks also dispersed the Regiments supply depot and transport based at the village of Eecke (about 5 miles to the East of Cassel) and by the morning of 28th May the Regiment had re-sited its guns and ammunition into the garrison of Cassel.
BEF assests aflame outside village of Eecke
RAMC Field Ambulance in Cassel
143rd Field Ambulance arrived in Cassel on 25th May. Corporal Stanley Watson, age 46 years, of 143rd F.A. wrote about his experience, after his successful escape at Dunkirk. He described being under mortar, and possibly air attack, at a RAMC Dressing Station in Cassel.
Corporal Watson wrote: “I am one of six left. I was blown out of my dressing room, which was in a barn, at a place called ‘Cassel’ which was blown to dust, there [some] got badly wounded and I got away with a few splinters which are now finished”

Corporal Stanley Watson, RAMC. July 1941. With thanks to Angus Watson
143 Field Ambulance produced an original sketch map, and chronology, of their advance into Belgium on 12th May 1940, the route taken to Cassel via Steenvoorde and the 143 F.A’s escape at Dunkirk.

Sketch map of 143 Field Ambulance’s campaign 12th- 31st May 1940 including their route to Cassel on 25th May. With thanks to Angus Watson
Among the casualties treated by 143 Field Ambulance were a transport of 9th Sherwood Foresters whose bus had stopped in the Grand Place on 27th May and received a direct hit from a Stuka dive bomber.
Three Field Ambulance units of the 44th (Home Counties) Division were also positioned near to Cassel at the village of Eecke; their Field Ambulance HQ was in a Monastery in the nearby Mont Des Cats.
These three units, including Corporal Stanley Waldron of the 133 FA, were dispersed during the battles at Cassel and the majority of personnel of 131 &133 FA were captured by the Germans.
Corporal Waldron was to spend the years 1940-43 in Stalag VIIIB. In 1943 Waldron was repatriated to provide medical support for other prisoners.

Corporals from 133 Field Ambulance. Stanley Waldron is on the left. With thanks to Malcolm Waldron
140th Field Regiment War Diary, National Archives
Major Christopherson’s War Diary, as ever understated, describes the 27th May as ‘a difficult and traumatic day’.
He describes how, during the course of that day, both his gun battery positions at Mont Des Recollets and the Regiments supply depot at Eecke had been overrun by German tanks.
27th May 1940
‘In the morning the enemy attacked all along the front and broke through South of the Regimental positions. About 09.00 I personally was proceeding to EECKE where our wagon lines were situated but had only gone 200 yards when I was turned back with the information that enemy tanks were further down the road. On our front line the 2nd Glosters and 4th Ox Bucks repulsed the morning attack. Owing to a breakdown in communications and doubt as to where our troops were, we missed some fine targets although we did do a fair amount of shooting. Pressure was kept up all day by the enemy and at one time the enemy reached within 50 yards of the kind of wall that surrounds CASSEL.
At 14.00 hrs. I found Regimental H.Q. was in the F.D.L. [front line] and I had to form a post on the main CAESTRE road just outside the Regimental H.Q. with one 18-pounder covering the road [providing] Anti-tank defence and six Anti-tank rifles and Lewis Guns covering nearly 180°.
About 18.00 hrs. the Westernmost Troop and Boyes Rifles between them knocked out five tanks. The enemy entered the Officers’ Mess and took away the wireless, but although this was only 100 yards to the flank of the guns they did not attack.
Other parties from Regimental H.Q. formed a defensive line and helped the Battery to drive off an enemy Infantry attack.
During this day the Troop North of the wood [Mont des Recollets] could not fire on the attack as CASSEL Hill intervened and there was no enemy attack from the North-West, so the Troop Commander went to assist the other two Troop Commanders.
At 21.00 hrs. Regimental H.Q. and the two Troops South of the wood [Mont des Recollets] moved into CASSEL itself as the Infantry could no longer provide any protection for the guns, and Anti-Tank positions were taken up in CASSEL for all round defence.
During the morning three enemy Tanks reached the wagon line (support area) at EECKE and dispersed Regimental H.Q. transport.’